

Selling Online Courses: Using Video to Drive Conversions
Are you finding it hard to get people to buy your course? Selling online courses takes more than just great content; you need the right strategies to attract the right audience and make them want to enroll.
In this article, we will show you simple, proven ways to sell your course successfully. We will cover how to find your ideal audience, use videos to grab their attention, and create a sales process that makes it easy for them to sign up. Let’s dive in.
How To Sell Online Courses In 2025: 9-Step Guide
As you go through this section, pay close attention to these key questions: How does your course topic solve your target audience’s specific problems? What strategies will you use to build trust and stand out in a competitive market?
Step 1: Create A Buyer's Journey For Your Course
The buyer’s journey is the roadmap that guides potential customers from discovering your course to purchasing it. Let’s break it down into 3 key phases:
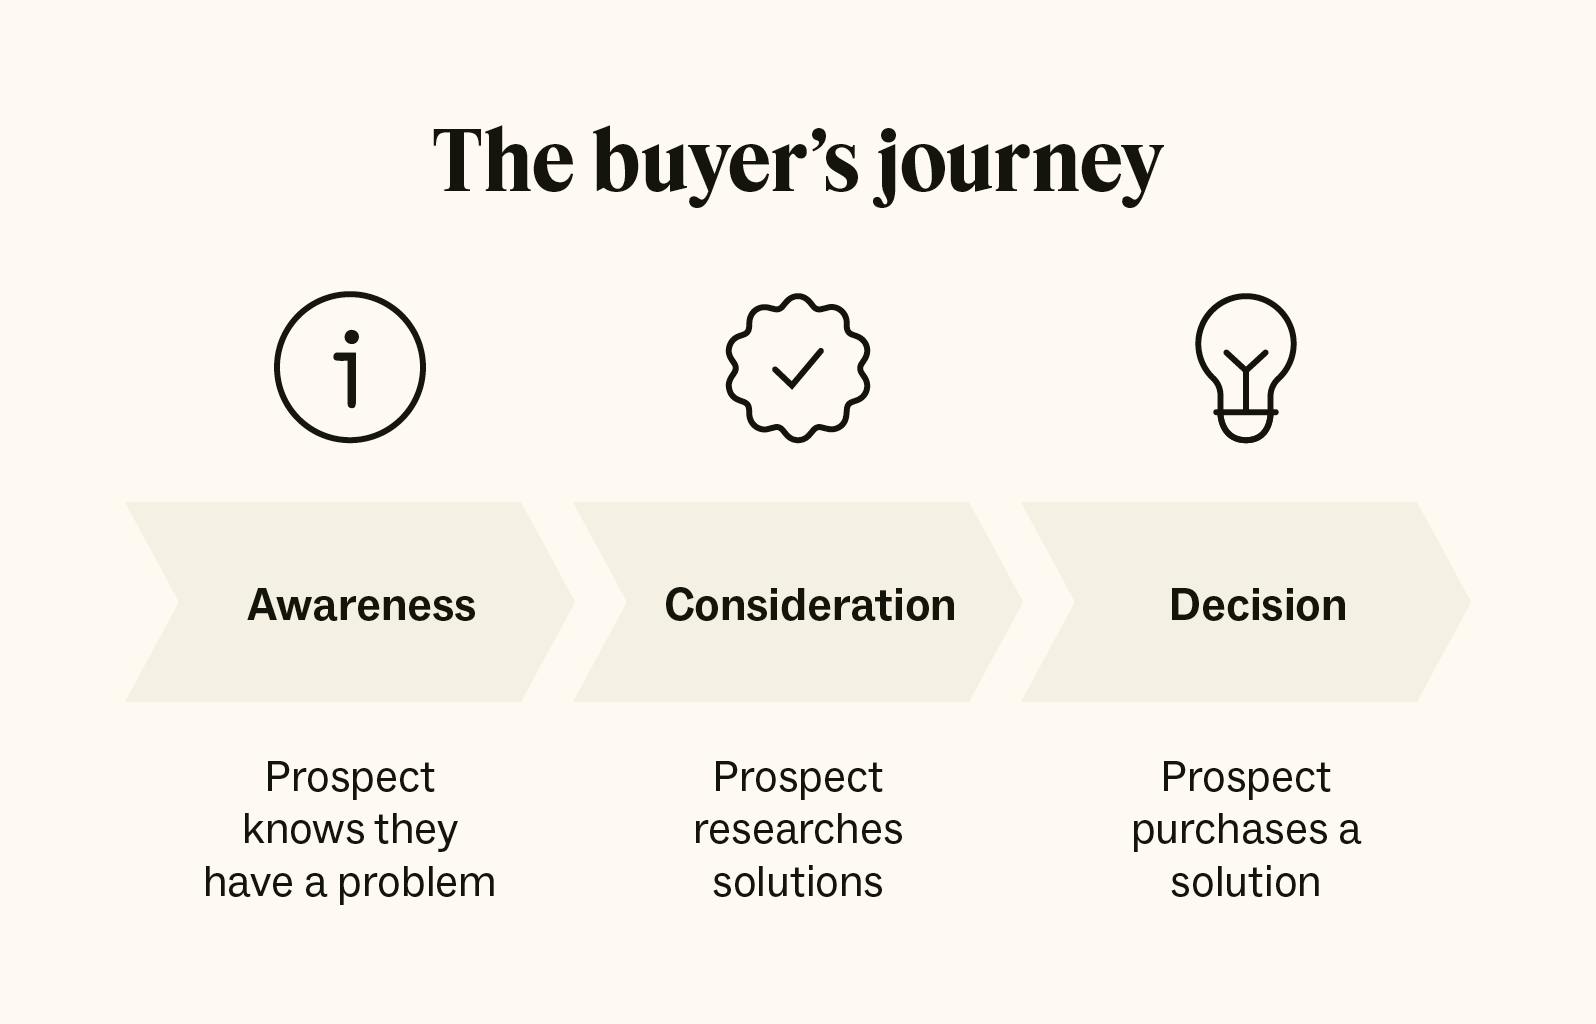
1.1 Awareness Phase: Capturing Attention
In the awareness phase, you let people know your course exists. Your job is to get their attention.
- Offer free resources like eBooks, templates, or mini-courses to encourage people to engage with your content.
- Use SEO marketing to rank for terms related to your course, like "how to start digital marketing" or "beginner’s guide to online advertising."
1.2 Consideration Phase: Building Trust
Now that your audience knows their problem, they start researching solutions. This is your chance to showcase your course as the best option.
- Share testimonials and success stories from past students to build trust and credibility.
- Send email follow-ups to keep leads interested after they download your free resource or attend your webinar.
1.3 Decision Phase: Converting Leads
At this stage, your audience is ready to buy but they need a final push. Focus on removing any barriers to purchase and emphasizing your course’s value.
- Highlight limited-time offers, bonuses, or enrollment deadlines to prompt action.
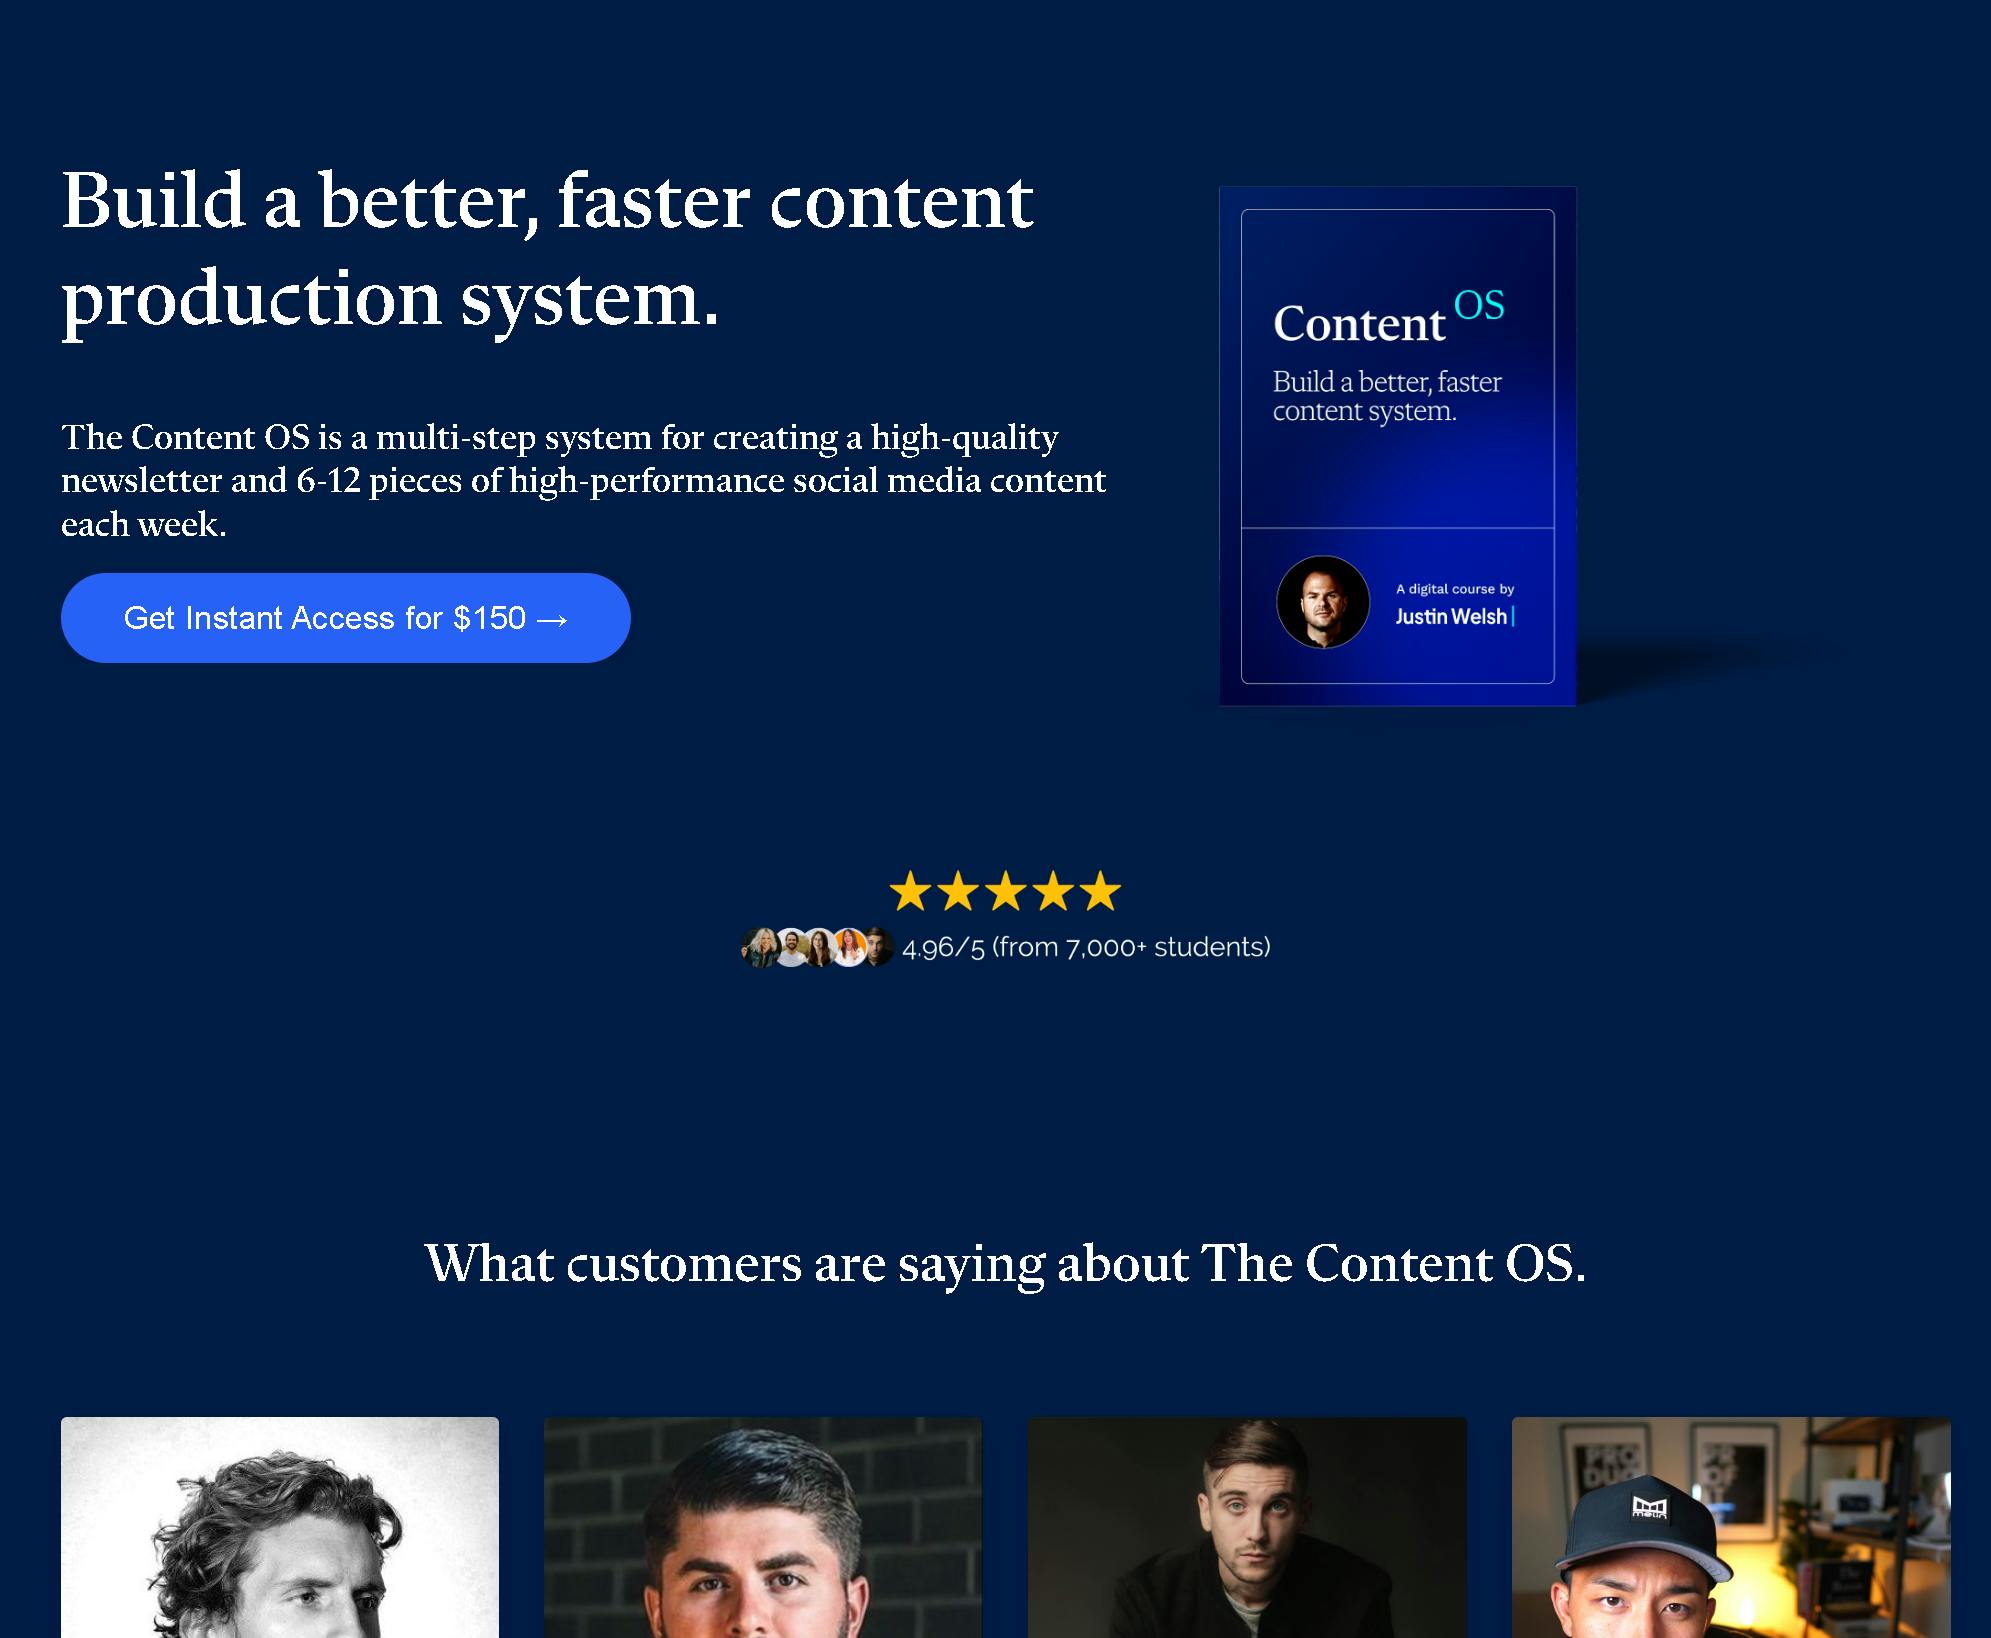
- Make sure your course landing pages have clear CTAs, and customer testimonials. A great example is shown here, where the course title is bold and benefit-focused, the CTA is straightforward (“Get Instant Access for $150”), and testimonials from real students are displayed prominently to build credibility.
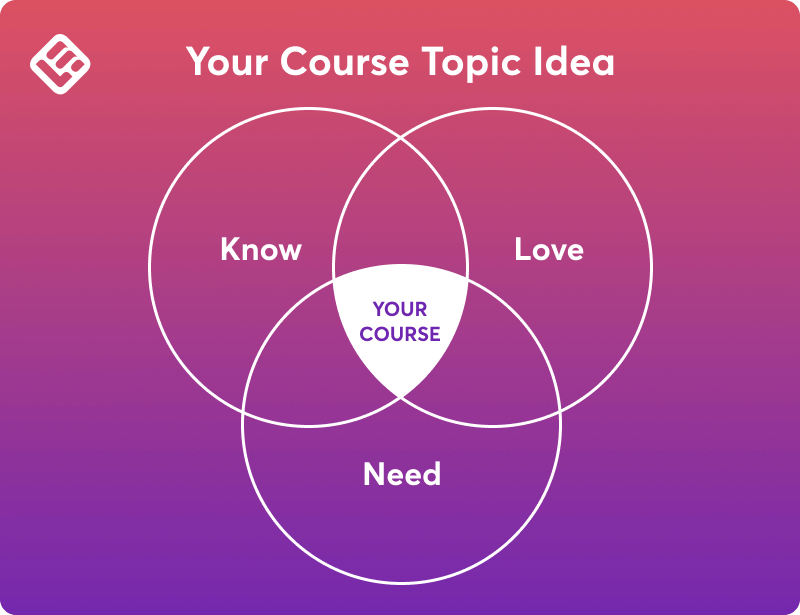
Step 2: Choose A Course Topic That Stands Out
Choose a topic for your online course business that connects with your audience, and solves their problems. Here's how to choose an attractive topic for a successful online course:
- Focus on what you know best or a skill you’re confident in teaching. For example, if you’re an expert in graphic design, narrow it down to a niche like "Creating Effective Social Media Graphics."
- Use platforms like Quora, Reddit, or Facebook groups to find recurring questions or challenges in your field. For example, if you notice many people asking about learning basic coding, that could signal demand.
- Validate your course topic by running a survey, creating a poll, or offering a free lead magnet like a checklist or webinar.
- Address a clear pain point that your audience faces. For example, instead of a broad topic like “Marketing,” focus on “How to Build a Marketing Strategy for Small Businesses.” This approach makes your course more relevant and appealing.
- Look at similar courses in your niche. If they are successful (check their reviews, ratings, and enrollment numbers on platforms like Udemy), there’s likely a demand but make sure your course offers unique value.
- Check out the guide sections on websites your audience visits, often in the footer, like on this business selling platform. Focus on the topics listed there because they show strong interest—people visit these pages for valuable information. This means they'll likely be interested in your video too.
Step 3: Create Your Course From Scratch
You need to break your course creation into smaller, manageable steps to make the process easier. Follow these steps to create online courses that stand out:
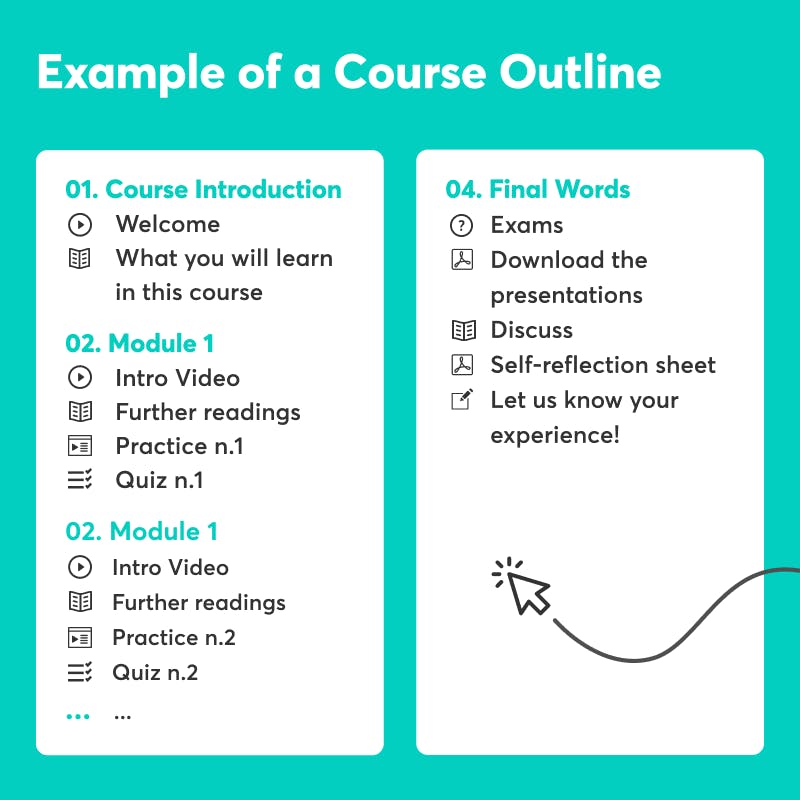
3.1 Plan Your Curriculum
Have a clear course structure so it flows logically and helps students achieve their goals.
- Define your course goals, like “Learn to bake a perfect sourdough loaf.”
- Break the goal into smaller steps like “Understanding ingredients,” “Mixing the dough,” and “Shaping and baking.”
- Group similar lessons into modules for better organization, for example, Module 1: Sourdough Basics, Module 2: Techniques, Module 3: Troubleshooting.
- Outline each lesson with focused topics like “Lesson 1: What is sourdough?” or “Lesson 2: How to make a starter.”
- Add activities or quizzes to help students practice and track their progress.
- Arrange lessons in a logical order so students can build their skills step by step.
- Use Google Docs or Notion to create your course outline and organize your ideas.
3.2 Choose The Right Format
The way you deliver your course depends on the topic and what will help your students learn best. Here’s how to decide:
- For visual learners: Use video tutorials. Screen recording tools like Loom or Camtasia are great for step-by-step instructions.
- For actionable content: Create PDFs, workbooks, or templates. For example, a checklist for launching a blog.
- For interactive learning: Add quizzes or live Q&A sessions. You can use platforms like LearnWorlds or Teachable for built-in quizzes.
For example, if teaching “Digital Marketing Basics,” you could:
- Create a video explaining the importance of SEO.
- Share a downloadable keyword research template.
- Include a quiz to test their understanding of SEO concepts.
3.3 Invest in Quality Production
Your course should look and feel professional. High production quality builds credibility and enhances the learning experience. To do so, you need to:
- Choose a quiet, well-lit area. Natural light works great, or use a ring light.
- Do a trial recording to check sound and lighting.
- Break them into short, focused clips (5–10 minutes each) to keep learners engaged.
- Trim mistakes and add slides or text overlays using free tools like iMovie, Shotcut, or Canva.
- Edit your content to remove unnecessary pauses or distractions. As your business grows, hire an assistant to handle editing tasks, so you can focus on creating and marketing your course.
- Use platforms like Teachable or LearnWorlds to access easy-to-use tools to host and organize your course seamlessly.
- Add interactive elements like polls or discussion boards to keep learners involved.
- Keep your tone conversational, and imagine you are explaining the content to a friend.
3.4 Test Your Course
Before launching, test your course with a small group of beta users to ensure it is valuable and easy to follow. Ask friends, colleagues, or your email subscribers to join for free or at a discount.
Ask questions like:
- Were the lessons clear and easy to follow?
- Did the content deliver on its promise?
- What could be improved?
Use feedback to fix unclear lessons, improve flow, or add missing details.
Step 4: Price Your Online Course with Flexible Payment Plans
Break the cost into smaller, more manageable payments to maximize course entries as it lowers the financial burden on students. Here is how to structure your payment plans:
- Split Payments: Offer 3–6 monthly installments with a slightly higher total cost to cover admin fees. For example, if your course is $300, allow payments of $105/month for 3 months.
- Pay-As-You-Go: Allow students to pay per module or section, ideal for courses with standalone lessons.
- Lifetime Access Options: Include a one-time payment option alongside payment plans for those who prefer upfront purchases.
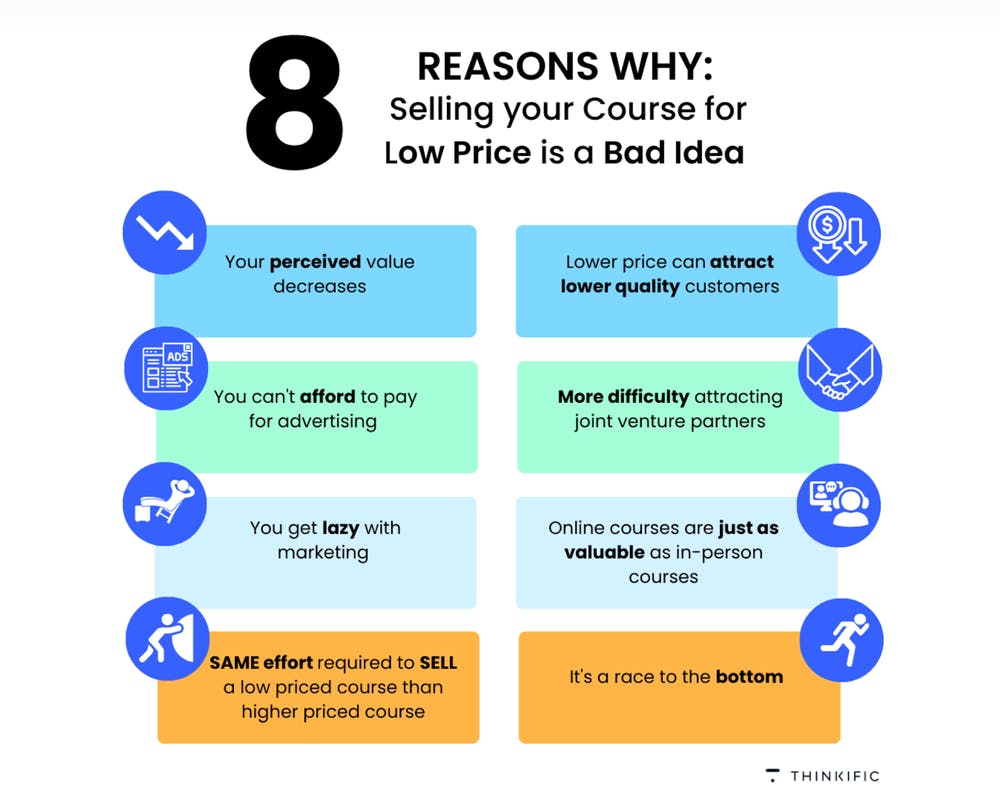
- Keep Your Course Value High: Avoid pricing your course too low. A low price can make people think the course is not high-quality.
Step 5: Decide On Your Online Course Platform
The best online course platform depends on your goals and audience. Ask yourself: “Does it fit my niche?” “What is my revenue goal?”, “Do I need marketing support?” There are 2 main types of platforms to sell your first online course:
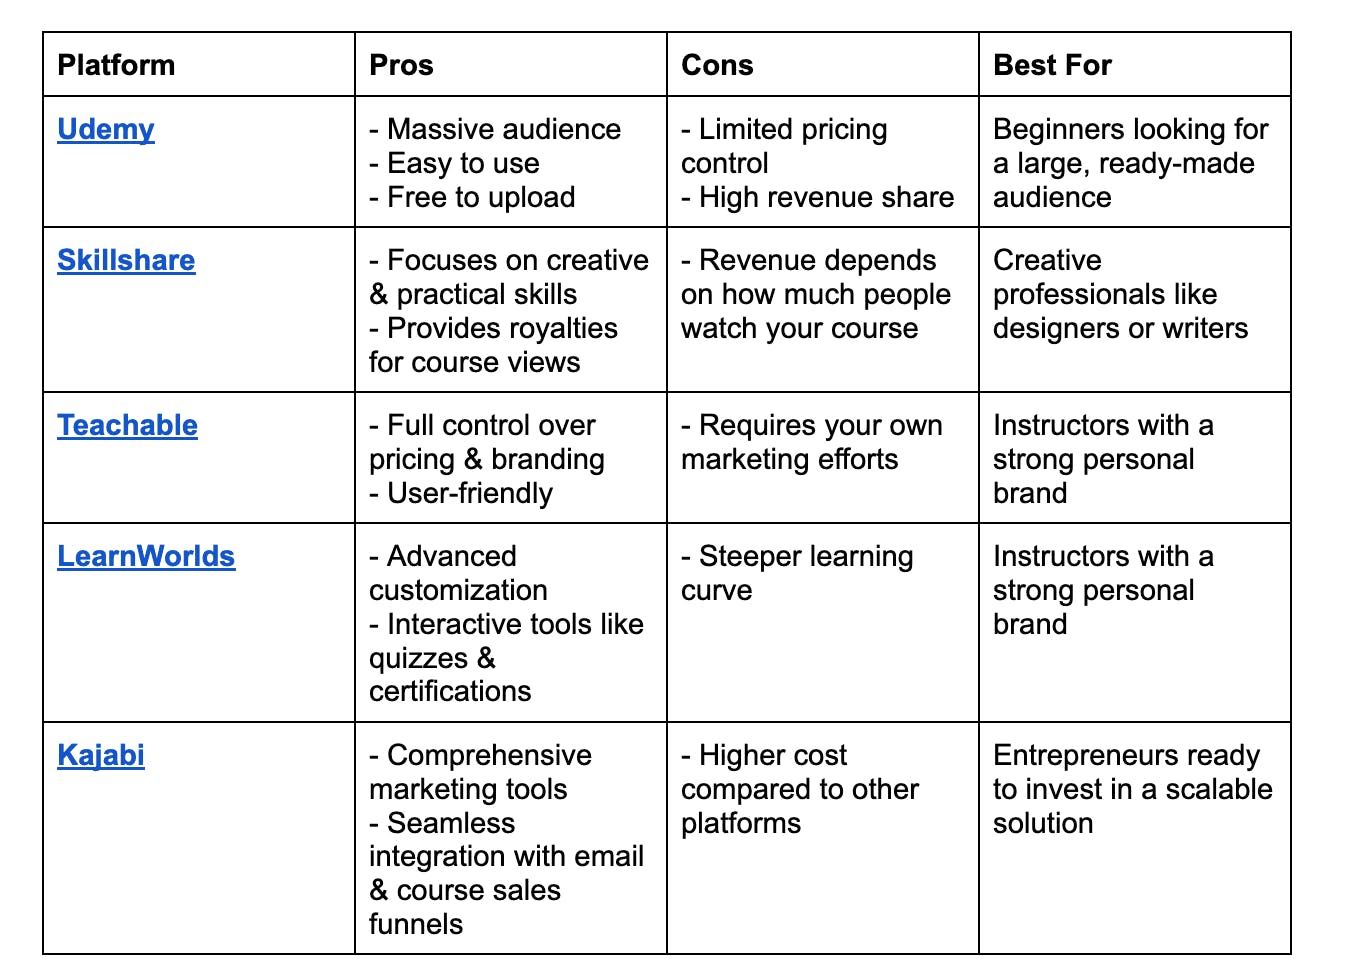
- Online Course Marketplaces: Platforms like Udemy and Skillshare let you list your course alongside others. They bring in traffic but take a cut of your revenue. Go for this option if you are a beginner and do not have a budget for heavy marketing.
- All-in-One Platforms: Platforms like Teachable and Kajabi let you create and sell courses online, and that too under your own brand. You handle marketing, but you keep more profits. It is best if you have an established audience or a strong marketing strategy.
Let’s find out the popular platforms for selling online courses:
5.2 Steps To Choose The Right Online Course Platform
- Write down your must-haves, like marketing tools, audience reach, or branding flexibility.
- Use free trials to test out features and see which platform feels intuitive.
- Look at pricing models, transaction fees, and hidden costs to make it profitable.
- Read reviews to learn from others’ experiences and spot potential challenges or benefits.
Step 6: Get Your Course In Front Of The Right Audience
To sell your course successfully, you need to connect with the people who will benefit the most. Here is how you can do it:
6.1. Spot Your Ideal Audience
To effectively market your course, you need a clear picture of who it’s for. Think about age, location, gender, and education level. For example, a course on graphic design might target creative professionals in their 20s–40s.
Keep in mind that in some regions, the population skews older. In fact, nearly one-third of states now report an average age above 40. This demographic shift can influence the types of courses that resonate with potential learners, especially if they’re looking for career changes or skill upgrades.
What problems do they face that your course solves? Write down their pain points. Create an audience persona, a fictional profile that represents your ideal customer. Give them a name, goals, and challenges to keep your marketing focused.
6.2 Leverage Paid Ads For Targeted Outreach
Paid ads target specific demographics and interests to reach your ideal audience quickly. Here is how to do it:
- Run Facebook ads to reach people based on their age, interests, or behavior. For example, if you are creating a course for an EMS reporting software like AngelTrack, target paramedics, EMS administrators, or first responders interested in “emergency medical services,” “incident reporting,” or “healthcare technology.”
- Use Google ads. For example, use phrases your audience might search for, like “learn digital marketing online”
- Experiment with retargeting to show ads to people who visited your site but did not purchase.
6.3 Collaborate With Influencers Or Partners
Team up with others in your niche to grow your reach. Here is how to do it:
- Look for influencers whose audience aligns with your course topic. Use platforms like Instagram, LinkedIn, or YouTube to identify creators in your niche who share content that complements your course. Use content collaboration tools like ClickUp to manage tasks, deadlines, and communication during the process.
- Write guest post articles or appear on podcasts in your niche to showcase your expertise and promote your course.
- Cross-promote with other course creators. Team up with someone offering complementary courses or services and promote each other’s content.
6.4 Identify Learning Hubs That Would Benefit From Videos
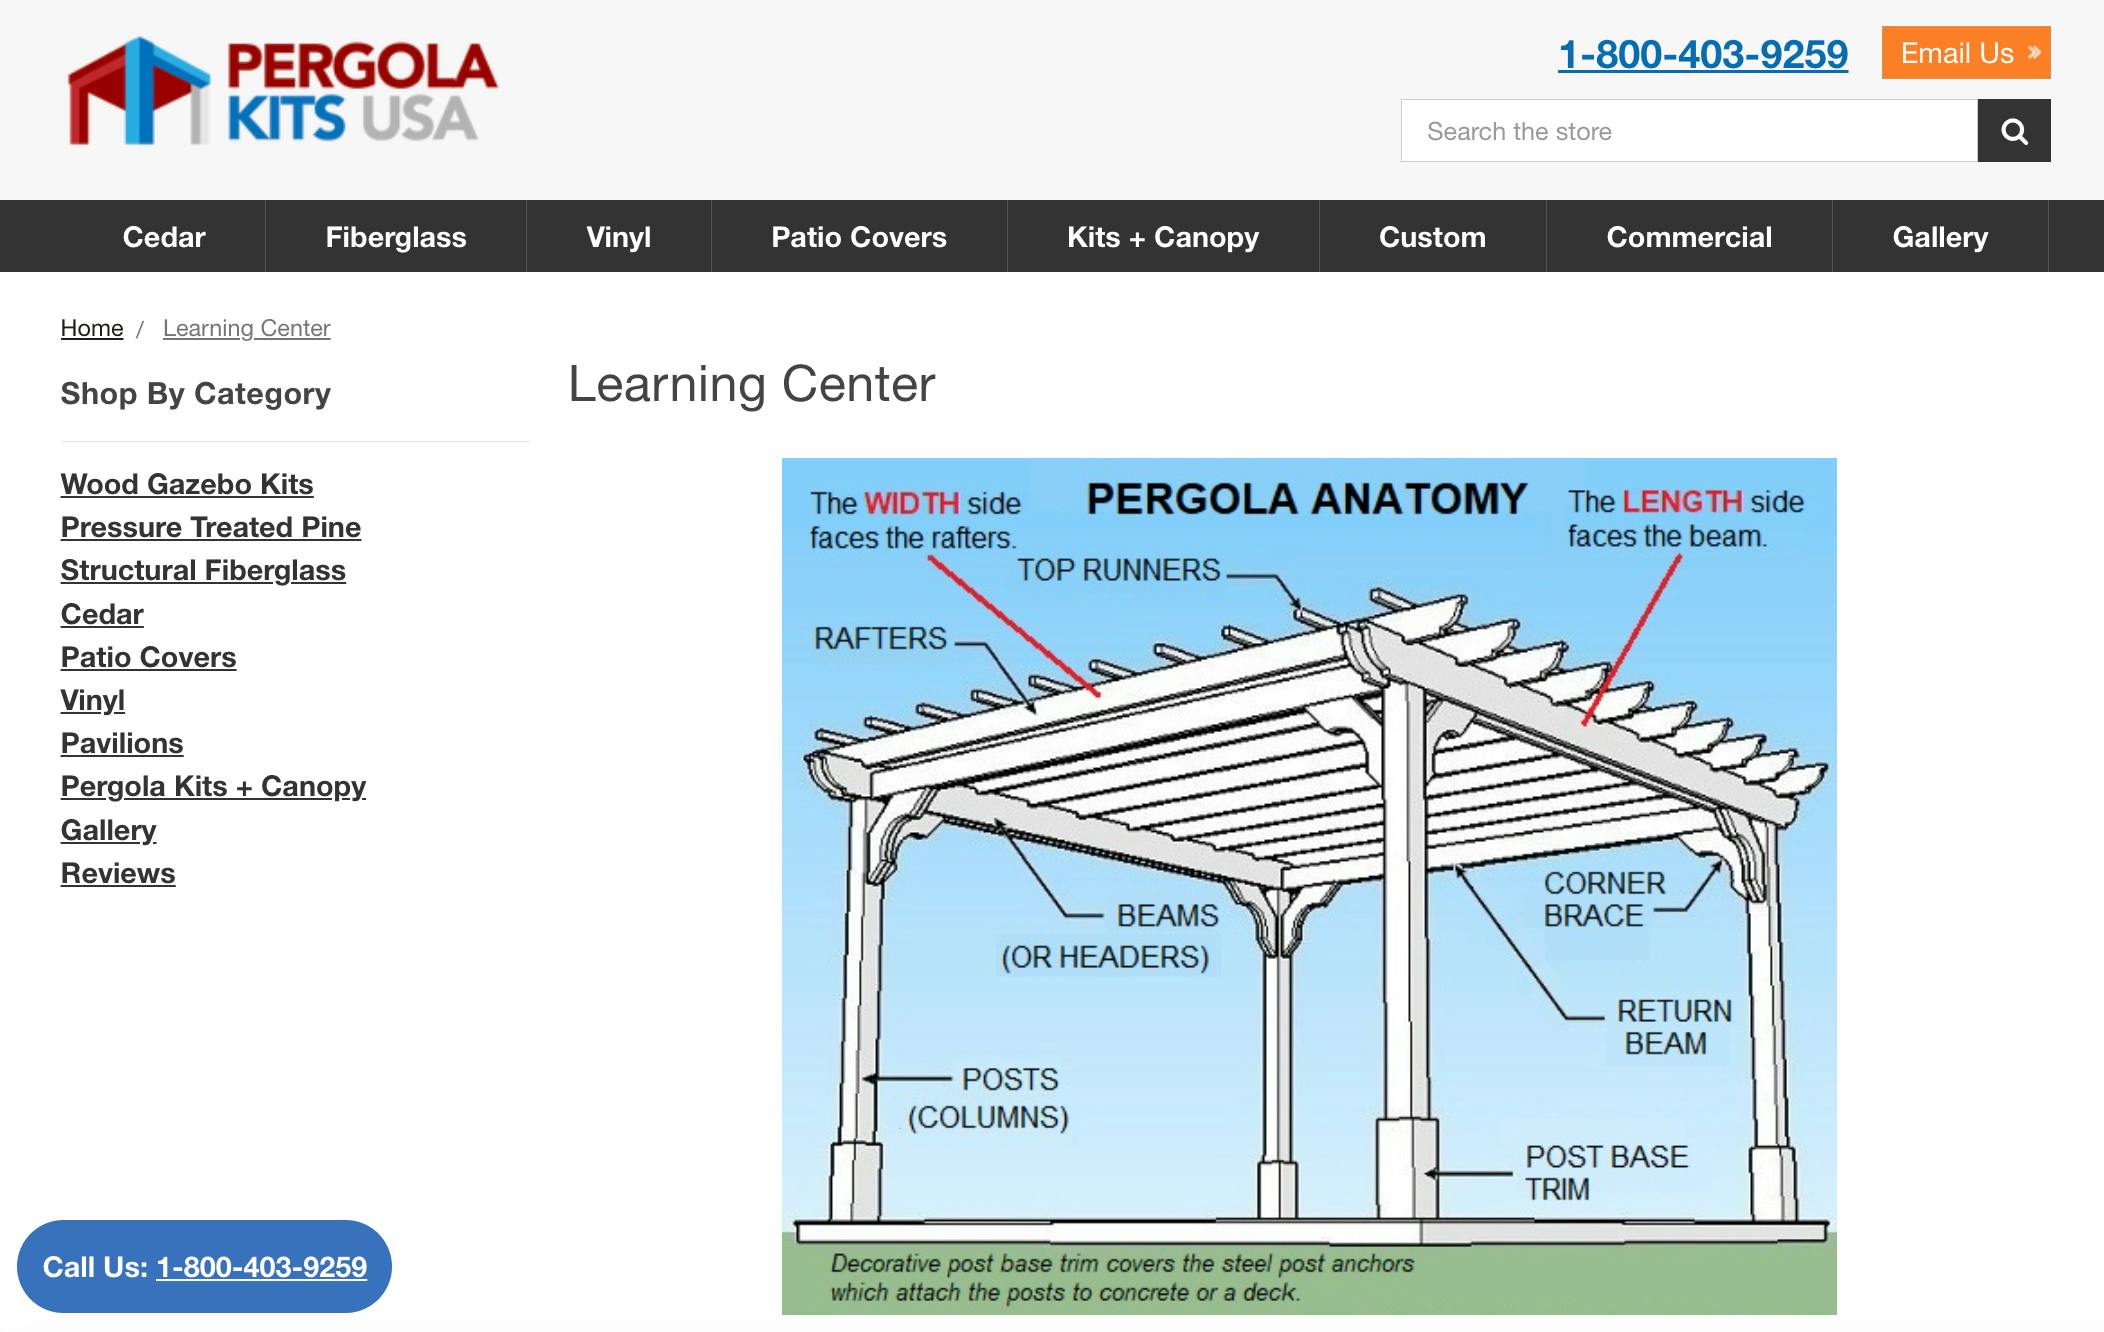
If your audience is made up of DIY enthusiasts, connect with websites that sell the products they use and offer your course as a helpful addition to their guides. For example, this pergola kit supplier provides an installation guide, you could create a custom video based on their product and direct viewers to your other videos afterward.
Step 7: Create Personalized Videos To Drive Conversions
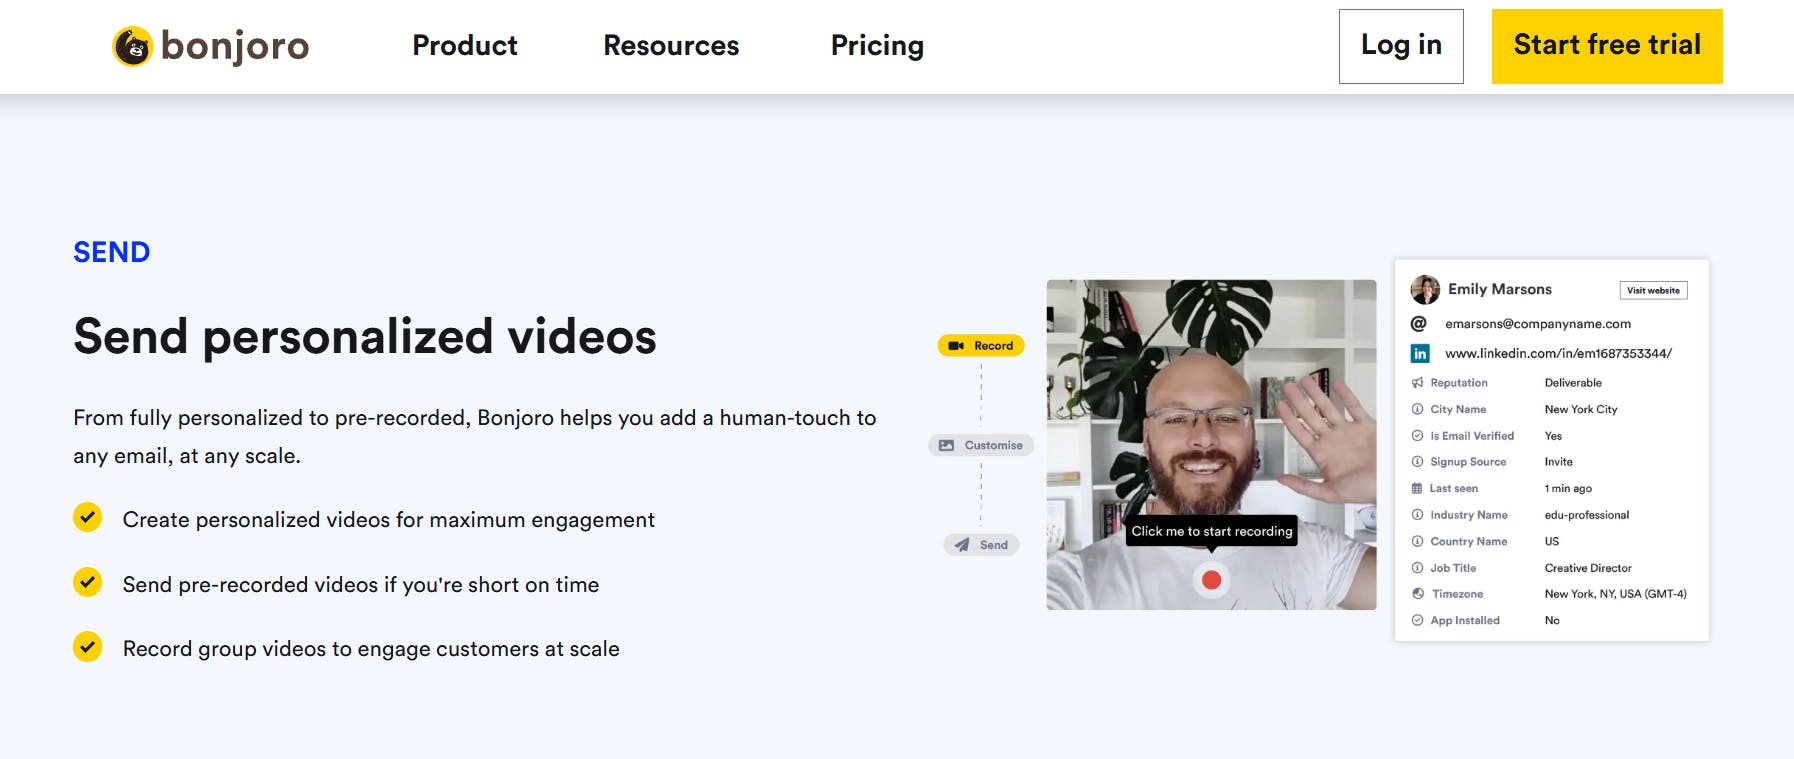
Use Bonjoro to create personalized video messaging that lands directly in your audience’s inbox. Engage subscribers the moment they sign up, purchase your course, or show interest in building genuine connections. Combine Bonjoro videos with Mailchimp or ConvertKit to automate your email campaigns and track performance.
Here is how to do it:
7.1 Welcome New Subscribers
Send a short, personal introduction video to say hello and thank your new subscriber. For example, “Hi [Name], I’m [Your Name], and I’m so happy you’ve joined! I’m excited to help you [achieve your course’s goal]. Let’s get started!” This personal touch creates an instant connection.
7.2 Follow-Up After Sign-Ups or Purchases
Use Bonjoro to personally thank those who register for your course or download your lead magnet. Mention how excited you are to help them succeed and invite them to ask any questions. For example, “Thanks, [Name], for joining my course! I recorded this quick video to welcome you and share a tip to get started on the right foot.”
7.3 Send Video Updates & Encouragement
As students progress through your course, use Bonjoro to send quick video check-ins. For example, celebrate their progress when they hit a milestone or remind them about upcoming modules.
7.4 Personalized Offers & Discounts
Use your email campaigns to announce exclusive discounts or bonuses for your course, but pair them with a Bonjoro video for a personal touch. This can dramatically boost open rates and conversions. For example, “Hey [Name], I have got something special for you—an exclusive bonus for completing your first lesson!”
Step 8: Build A Community Around Your Course
Select the platform based on where your audience hangs out the most. Use Facebook Groups, Slack, or your course platform’s community feature that integrate with your course. Follow these 4 steps to get started:
- Welcome members by posting an introduction message with clear community guidelines.
- Share prompts, tips, and questions to spark conversations.
- Give bonus resources, live Q&A sessions, or behind-the-scenes content.
- Celebrate wins by highlighting student milestones, like completing a module or reaching a goal.
Step 9: Use Upselling & Cross-Selling Techniques
Encouraging students to invest in advanced options of your course or offer related products or services. For example, If your course teaches beginner photography, offer an advanced course as a premium upgrade or pair your course with photography presets or editing templates to complement their skills.
- Create packages where students get discounts for purchasing multiple courses or services.
- Offer time-sensitive upsell or cross-sell deals immediately after purchase, like a 20% discount on advanced courses valid for 48 hours.
- Send targeted emails promoting premium options or related resources based on what students already purchased.
Conclusion
As you implement these techniques, ask yourself: Where in my sales funnel—landing pages, email campaigns, or social media—will I strategically place videos to maximize their impact? This question should guide your approach, especially when nurturing leads or connecting with students.
One way to stand out is by using tools like Bonjoro. With Bonjoro, you can send personalized video messages directly to your students’ inboxes. Whether welcoming a new subscriber, thanking a purchaser, or encouraging a student mid-course, these personal touches make a lasting impression and foster stronger relationships.